File recovery using Knoppix
This article hasn’t been updated since September 2005. If you found this page via a search engine and you know what you’re looking for it may still be of use. However, if you wanted a general overview of the topic you should consider finding a more up-to-date resource. (I removed all links to this page from my site, but I left the page so you wouldn’t get a “404 Not Found” error when you came across it via a search engine or link.)
Recovering files from a Windows PC that won't boot
This page will guide you through the process of recovering your files from a PC. It is relevent to you if:
- Your PC won't boot (start up)
- You've forgotten your password and can't log on to your home PC (not an office PC)
If you were to wipe the disc and reinstall you'd lose all your files. This page goes through a possible solution using Knoppix, a free (and legal) OS. Some quick definitions:
- Operating system (OS)
- At a simple level, this is the basic software that runs on the computer to help you copy files, run programs and so on. Windows is an OS, and so is a Linux Distribution.
- Linux
- Free software that is the core of many operating systems, the main program that joins together all the hardware on your PC. It's Open Source which means anyone can look at the program's source code if they want to.
- Knoppix
- A complete OS with Linux as it's core (kernel). It has many, many programs and fits onto one 700 MiB CD-ROM. It runs from the CD, so is excellent for recovering data as it doesn't modify or install onto your hard drives at all.
Requirements
If you want to copy your files over a network (of two or more computers), you will need:
- Another computer. If you don't have another, see the alternatives below
- Network cards in both computers
- Either:
- A crossover cable, to connect the two computers together directly
- A hub or switch, which you probably have if you have a network already (this is easier)
- Some free space on the second PC to move your files into.
If you want to copy them to another computer on the internet (using FTP or SSH) all you need is:
- An internet connection (preferably LAN, broadband or cable)
If you don't have a fast internet connection, you can copy your files to a writable CD. For this you need:
- Two CD drives, one for Knoppix and one for writing CDs
At the moment, this guide focuses on the first option. Writing CDs is easy however, follow the steps to boot Knoppix and run K3B from the Knoppix menu. You can also try a USB pendrive (though I have had problems with certain models crashing Knoppix), a floppy disc, or a second hard disc.
Obtaining Knoppix
If you're prepared, you already have it ?. If not, it's a big download! You'll need ADSL or cable internet (or a kind friend or business) to download it -- note it's about 700 MB in total!
You can also order it on CD -- search the internet for a local supplier.
If you are downloading, go to the Knoppix Download Page. Choose a mirror site near you, read the agreement and continue. You need the file called KNOPPIX_V3.6-2004-08-16-EN.iso or something similar (there's probably a newer version available, in which case get that). Burn the .iso file to a CD (How you do this depends on your software, but the KNOPPIX-FAQ-EN.txt file in the download directory might help if you don't know how, or if it doesn't work).
Instructions
I'm assuming you have Windows XP Professional on the working PC, since that's all I have available for screenshots and so on. If you have Windows XP Home or Windows 2000 it shouldn't be too different, with other versions (ME, NT, 98, 95) you might have to search around a bit for the options I use. It doesn't matter what was on the broken PC -- it can be Windows XP, 2000 or anything, even Linux, so long as it is a PC. If you have a Mac, you'll need to look elsewhere! Try Google.
Preparing the working Windows machine
Configuring the network
Screenshots coming soon!
- Log on
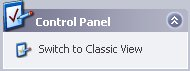
- Click Start → Control Panel, or Start → Settings → Control Panel
- Click Switch to Classic View if you see it in the corner
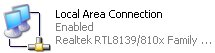
- Double click Network Connections

- Right click Local Area Connection and select Properties
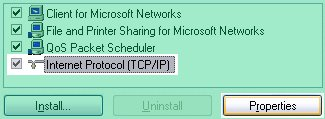
- Click Internet Protocol (TCP/IP) then Properties
 There are now two possibilities:
- Obtain an IP address automatically is selected. You don't need to change anything if you can plug the Knoppix computer into the same network as this computer so close the dialog. If you're using a crossover cable you will need to select an address manually -- see the next bullet.
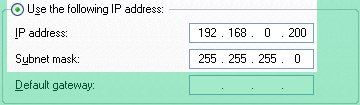
- Use the following IP address is selected. If there's already an IP address, write it
down, and also the subnet mask and gateway. If not, type 192.168.0.200 in for an address,
255.255.255.0 for the subnet mask and leave the gateway address blank.
- Click OK to close the window. If you need to restart your computer, do so.
- Now double click the Local Area Connection icon and click Status
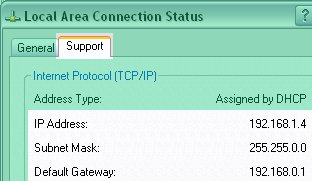 Choose the Support tab, you should see an IP address and a subnet mask. Write these down.
Sharing a folder
We now share a folder for the recovered files.
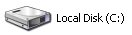
- Click Start → My Computer

- Double-click Local Disk C.
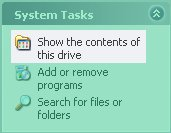
- Click Show the contents of this drive if your files are hidden
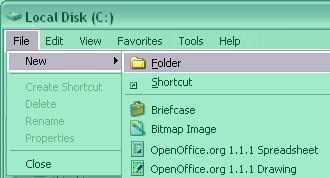
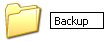
- Click File → New → Folder and type the name Backup.
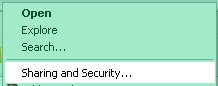
- Right click on the Backup folder, and click Sharing and security (or Properties then Sharing).
- Tick Share this folder on the network and Allow network users to change my files. Make the sure the share name is Backup.
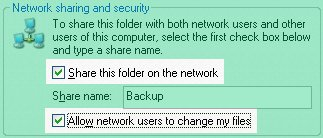
- Click OK
Finding the name of the Windows computer
You might already know the name, but here's how to check:
- Open My Computer again
- Click File → Properties
- Click Computer Name and write the name down. (Note: the screenshot is from Windows XP Professional. Other versions
of Windows differ slightly)
 If you are a home user you may change this name.
 - This computer is called RIDCULLY. Wherever you see RIDCULLY, you should type the name of your Windows computer.
Preparing the Knoppix machine
Loading Knoppix
- Turn on the computer and put the Knoppix CD in the drive
- You might see the Knoppix screen -- if Windows boots (or tries to boot, or if nothing happens), just reset the computer
- If it still doesn't load Knoppix, you might need to press a key to boot from a CD. Try finding an option to Boot from CD. Look for a boot menu, or try F12, F8, F2. You may need to change settings in the BIOS, search the internet to find how to do this.
- Knoppix gives you a chance to type a command, it says boot:_. Usually you can just press enter. You can, however, change the keyboard layout, which is American English by default. If you want to, type one of these instead and then press enter:
- knoppix lang=gb if you have a UK layout (with 2 and " on the same key, US layout has 2 and @)
- knoppix lang=de if you have a German layout -- note that everything will be in German if you choose this (and this is the default on the German download)
- knoppix lang=xx where xx is the two-letter code for your country (as on internet addresses)
- Lots of text scrolls up the screen. Ignore it! Wait for everything to load -- it takes a few minutes as everything is being read from the CD
- If the computer hangs (nothing happens for several minutes) try resetting it and typing knoppix noapic noscsi noapm nousb lang=xx. This disables certain parts of your computer for Knoppix (power control, SCSI, power management and USB)
Configuring the network
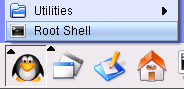
- Load a root (administrator) shell (command line). To do this, click the little picture of a penguin (called Tux) and select Root Shell.
- Now type ifconfig and press enter. You should see some text, if you can see eth0 and some information you can skip this stage.
- If you just see lo and some information (about 8 lines) you need to type netcardconfig and press enter.
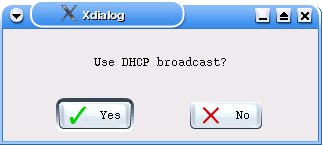
- Click No for Use DHCP broadcast.
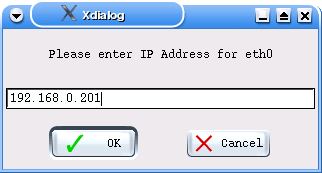
- If you chose 192.168.0.200 earlier, type 192.168.0.201 in the box and click OK. If there was already a value in the box in Windows
you should use the IP address assigned to this machine, ask you system administrator. If this is a home network, you can
choose any similar value (for instance, if the other computer had 192.168.3.12, 192.168.3.20 is probably OK).
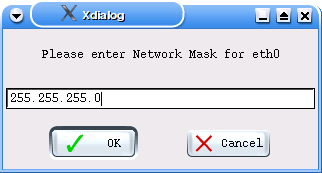
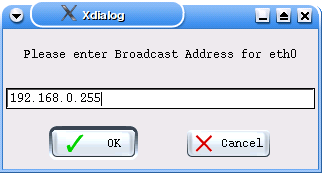
- Click OK for netmask and broadcast address.
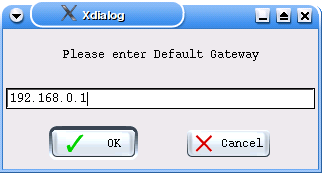
- If you know your gateway, you can type it in and you'll get internet access in Knoppix, if not just click OK.
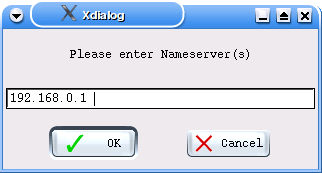
- If you know your nameserver(s), type them in too. It doesn't matter if you don't� they are for accessing the internet.
- Click OK until the configuration finishes. Some commands will show up. Type ifconfig again. This time you should see eth0.
- If you need to send an urgent email or do a last minute bid on eBay, then, if you typed the correct gateway and nameservers, you should be able to access the internet. Click Konqueror or Mozilla
 if you need to use the internet.
 - Type ping 192.168.0.200 (or the IP address of the other computer). You should see something like this: root@ttyp0[knoppix]# ping 192.168.0.200 PING 192.168.0.200 (192.168.0.200) 56 data bytes. 64 bytes from 192.168.0.200: icmp_seq=1 ttl=128 time=1.50 ms 64 bytes from 192.168.0.200: icmp_seq=2 ttl=128 time=0.686 ms 64 bytes from 192.168.0.200: icmp_seq=3 ttl=128 time=0.728 ms 64 bytes from 192.168.0.200: icmp_seq=4 ttl=128 time=0.766 ms Press Ctrl+C (hold down the Ctrl key and tap C) to stop it. This means the computers are successfully connected!
Opening the shared Windows folder
I'm assuming you're Windows computer is called RIDCULLY, so use your computer's name wherever I type RIDCULLY. You will need to swap 192.168.0.200 for your IP address if it is different, too.
- Type smbclient -L RIDCULLY -I 192.168.0.200 -U administrator and press enter. You'll have to type the administrator password in now, if you don't know it replace adminstrator with your user name and use that password, e.g. smbclient -L RIDCULLY -I 192.168.0.200 -U rincewind.
- You should see something like this: root@ttyp0[knoppix]# smbclient -L RIDCULLY -I 192.168.0.200 -U rincewind Password: Sharename Type Comment --------- ---- ------- hpdj940c Printer hp deskjet 940c series IPC$ IPC Remote IPC Backup Disk Documents Disk print$ Disk Printer Drivers ADMIN$ Disk Remote Admin C$ Disk Default share Server Comment --------- ------- Workgroup Master --------- ------- See the Backup share? That's the folder we shared earlier.
- Now type mkdir /mnt/backup. This has made a folder. To see it, type ls /mnt
- Now to access the Backup folder on the Windows machine. Type (carefully, all one line) root@ttyp0[knoppix]# mount -t smbfs -o username=administrator,password=adminpassword,ip=192.168.0.200,rw //ridcully/backup /mnt/backup
- Type touch /mnt/backup/testfile. You should see a file called testfile now on the windows machine in the Backup folder.
Copying the files across
- Type konqueror /mnt/backup &. You should see a window with the file testfile in it.
- Minimise the command line (don't close it)
- Click the hard disc icon on the desktop.
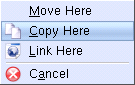
 This the this computer's disc. You can browse through the files as you would on Windows. To copy them, drag them into the /mnt/backup folder and click Copy.
- You can load some of the Windows files, but not all of them. You can look at standard images (e.g. photographs from a digital camera), sound (e.g. music), most video, and some documents (including Microsoft Office, OpenOffice.org), but there aren't Linux programs for every file type on the Knoppix CD. Of course, you can copy them to /mnt/backup and look at them on the Windows machine.
- Here are some common locations for storing files in windows -- these are places you should look in to fine your work.
- /mnt/hda1/Documents and Settings/username/My Documents
- /mnt/hda1/Documents and Settings/username/Desktop
- /mnt/hda1/Documents and Settings/username/Favorites
- /mnt/hda1/My Documents (for older versions of windows)
- /mnt/hda1/Windows/Profile (again, for older versions of windows)
- Also check /mnt/hda1/Program Files for saved games and some documents, in particular if you have a digital camera you should look for your photographs in here if they aren't in your My Pictures folder.
Finishing
- On the Windows PC, you might like to unshare the Backup folder, and change any setting back as they were, in Network settings for instance
- If you're sure you have all your files from the ?broken' PC, and if you have the original Windows CD, you can reinstall Windows. Some people suggest that starting from a completly blank hard disc is a good idea, to wipe your hard disc from in Knoppix type this command (after typing su): dd if=/dev/zero of=/dev/hda bs=1M Be warned -- this will remove ALL data from the computer, only do this if you are sure you have copied everything to the other PC, and checked it.
- Click Logout (from the kicker menu)
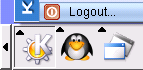 to exit Knoppix, wait, then remove the CD as instructed.
 - You can then install Windows. Of course, you might like to install Linux, there's lots of information on the internet on how to do this if you're a beginner. A distribution like Mandrake Linux is recommended (by me, anyway).
I hope you recovered all your files. If, when you clicked the hard drive icon, you got an error message, or there was an error reading from the disc, your hard drive might be physically damaged. I would suggest you take your PC to a specialist data recovery service if you really need the data, and purchase a new hard drive.
I'd like to know if this was useful to you. Hopefully you have recovered your data for the price of a blank CD, many companies charge upwards of £30 to do this for you!
You might find my page of Knoppix newbie commands useful.


 This work by